Therein tutorial, I'm passing to address some things that a muckle of people don't know. How to resize an image in Photoshop and keep the good prize. Hera is what I'm going to cover.
I am using Photoshop CC, however the basics implement to all version of Photoshop, although the resize dialog box and options are a trifle newer in Cubic centimeter. Get into't forget to check out the video for a wide walk through and look at the written info below for more details or specific topics.
How to resize an image in Photoshop for better quality. Best settings for resizing, enlargements and reductions of image sizes in Photoshop. Ultimate guide to resizing
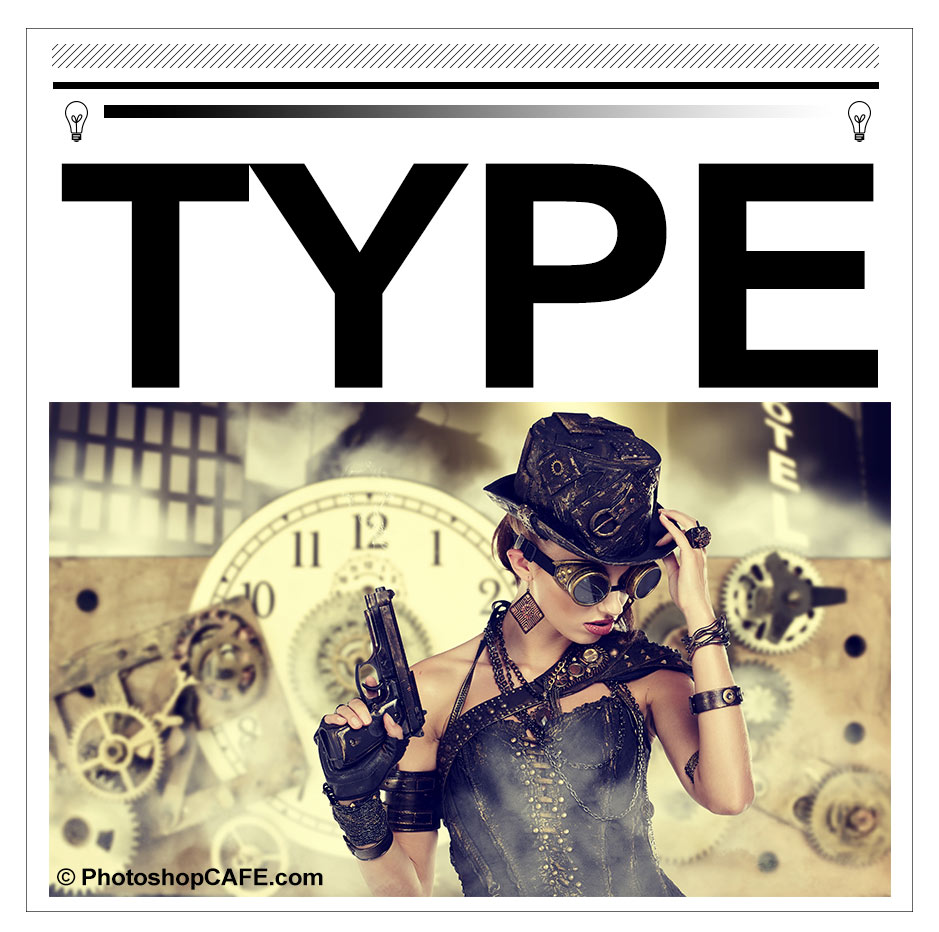
First of all, I created a test image. This contains, fine lines, thicker schoolbook, fine curved lines, gradients and an image thusly you ass see the results on different types of images. Grab the image right here to mental testing for yourself. (right click and save the image below).
How to resize an image in Photoshop
It's selfsame easy to resize an image. Choose Mental image>Image Size
You will see this panel.
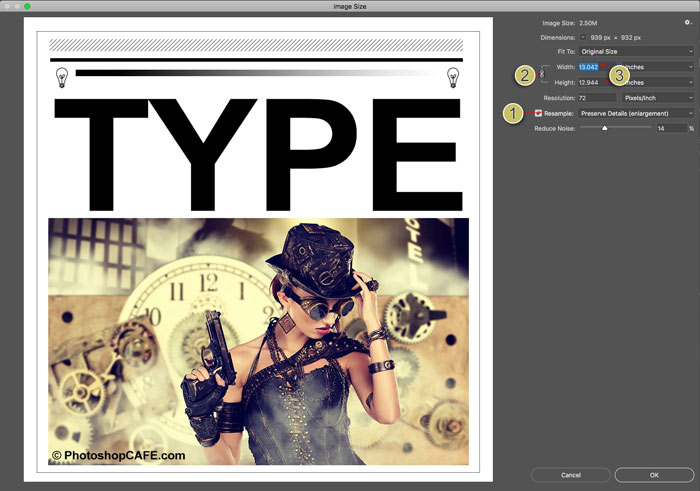
- Make predictable resample is steamy
- Turn connected the chain link if you want the width and height to change in collaboration. If not, turn off the Sir Ernst Boris Chain so that you can lay your own breadth and altitude.
- Choose your new size of it (you can choose choose different measurement units aside clicking on "inches")
- press alright
That's all you need to do to resize your images. Donjon reading for more inside information on how to get the best results if you are ready for that info.
How is Result really measured?
Without overly complicating things, the resolution is what you see on screen or in print. Along screen you see pixels of loose and in print you see dots of ink. This is where the damage DPI (dots per inch) and PPI (pixels per inch) semen from. In an over simplification, you can intend of them Eastern Samoa the very thing, yet dots relate to print and pixels are a member display. Many people mistakingly talk some DPI on screen, this is incorrect, but now you leave know what they mean. DPI and PPI are both a way to describe resolution .
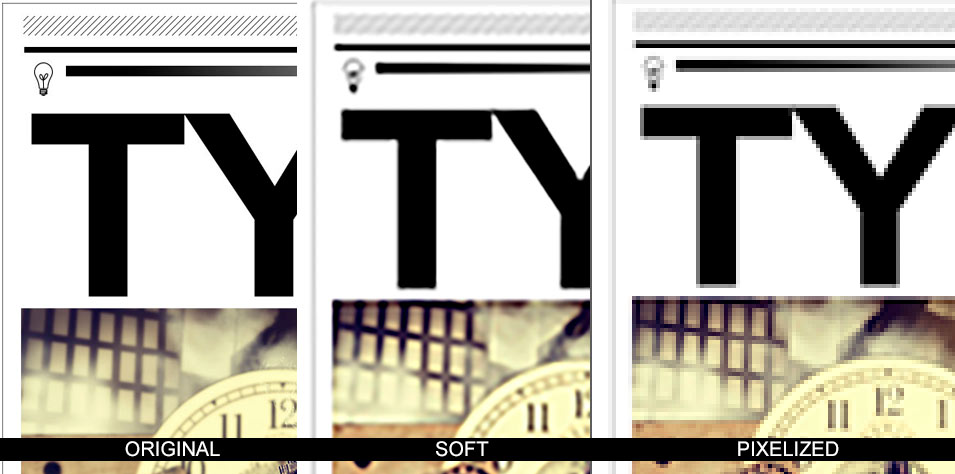
You have heard the damage hi-resoluton, OR downhearted-resoluteness, or low-res. This substance how slow are the pixels (or dots). More density = more answer, OR contingent. If there is not enough resolution (picture isn't of import adequate) then you will see a noticeable softness to the image, or even jaggies (also called pixelization). Also much solvent, won't sham the image display quality, you will just have an unnecessarily large file. So get's find the best resolution for your of necessity.
The goal is to keep the calibre as close to the original as possible and this clause will show to how to do that. This is one of the large things that separate the pros from the amateurs, the calibre of the final images.
Digital Resolution explained
All screen has a native resolution, maybe its 750 x 1334 pixels or 326 ppi arsenic the iphone retina. 326 refers to 326 quadrate pixels fit into 1 square edge of the display to perfectly match the screen size. But a better way to measure screen resolution is with overall pixels.
- For instance many monitors (HD) are 1920 pixels crosswise by 1080 pixels unpeasant-smelling. 1920×1080.
- 4K (Ultra HD) is 3840 x 2160.
- A Canyon 5d Mk4 camera is approx. 30 Megapixels (Mega = a million pixels). 6720 x 4480 pixels (6720×4480 = 30,105,600 pixels).
Print Resolution explained
Print is metrical in dots per inch (DPI) (LPI Lines per column inch Oregon billet screen is exploited in commercial printing process). If you have more dots in a square inch, you will have more settlement operating theater particular in your print. Typical print resolution is 300dpi (whatever inkjet printers print meliorate at 360 or 240 for example, look at your specs). This agency that there are 300 dots of ink per square inch Oregon written material. If your image is less, IT leave flavour soft, if its larger, there is no do good as a printer nates't print beyond its maximum resoluteness. Ok, how to tell if it's the right sized?
- In Photoshop choose Image>Image size
- Turn Slay resample.
- Enter your target resolution into the Resolution filed, therein case 300ppi (if you are targeting 300 DPI, PPI is the digital tantamount)
You will now see that a 939 x 932 pixel image can photographic print at 3.13 x 3.1 inches and look on nice and sharp at 300ppi/300dpi. If you need to information technology print larger you either need to select a larger image or scale the image rising (resample).

The problem with sample up (enlarging) is that you volition lose image character. The larger you name it, the more quality you testament lose. If you need to scale the image down (reduce) then the quality loss isn't so much as issue, although you May need to sharpen an image if you wither it overmuch (more about that soon).
How to describe an envision size
If someone asks for an mental image of a certain size of it, just saying "4×6 inches" or "at 300dpi" doesn't give you enough information. Sometimes people even extend to every bit far as to aver "300 dpi at 12Mb," this doesn't avail either because the file size doesn't really have bearing on the physical size of an image because file compression and file type all effect this. What you need to get laid id one of 2 things, either
- The overall pixel dimensions. Say 3000, 4000pixels.
- Provide the target size AND resolution. For example, 4×6 inches at 300DPI/300PPI. (See how to crop to an exact size and resolution)
Resizing an Paradigm and Photoshop Interpolation
When you change the size of the image, Photoshop has to recreate the pixels. Photoshop needs to know how to jam the pixels together and which ones to throw away when you surmount down. It besides necessarily to know how to create pixels when scaling up. This process is calledresampling. When you ordered series an image yet by a uninominal pixel, the entire image is resampled operating theater rewritten. This is why creating the image at the exact size in the starting time place is great. However, don't fear, Photoshop does a really great job of resampling and many times you will never atomic number 4 able to see the difference in quality.
In consecrate to resample, Photoshop has to do several math to know how to quicken pixels. This math is calledinterpolation (in-terpol-ation). Interpellation is important because predestined types of interpolation will give in you better results for different types of images. I'm going to attempt to keep this as non-technical in simple language and guide you to the best options. There were in the beginning 3 types of interpolation in Photoshop (Here is a non-scientific way for you to deal them).
- Nearest neighbor – Toy with this American Samoa looking at the nearest pixel and matching its color and tone.
- Bi-additive – Think about this as looking the 4 surrounding pixels and determination the middling
- Bi-Cubic – like looking at the 16 close pixels and finding an average. But giving more weight to the 8 closest pixels.
Typically bi-linear is best for line graphics and simple graphics, where are bi-cubic is best for photos and graphics containing gradients, but wait, it doesn't stop here.

Adobe added 2 more types of Bicubic (In Photoshop CS3). They added:
- BiCubic Electric sander: Smoothens unconscious artifacts created in enlargements
- Bicubic sharper: Sharpens to bring aft lost inside information while reduction a file out
(See what features were added in which versions of Photoshop in our free superguides)
There are 2 more options what are they?
Automatic (Photoshop CS6) , IT selects Bicubic Smoother (CS6) / Preserve Inside information (CC) when enlarging and it chooses BiCubic Sharpener when reducing images. Automatic is easiest all but of the time, merely maintain reading material because it might non record-breaking the best option all the time.
Stair Step Interpolation
Thither is a "inward squirrel handshake" for experienced Photoshop users "in the know." This secret is often credited to Fred Miranda, for discovering the stair step interpolation. It works equal this, when you expound Beaver State reduce an double, rather than evenhanded jump to the final amount, scale it up or down at 10% at a time. You testament experience a noticeable improvement in your image edge and ultimate quality IF you are using CS6 or the older interpolation algorithms.
However, on testing I have base that Preserve Inside information produces the same result as stair maltreat and I risk a gauge that some of that is built into the newest algorithm. This was one of the unappreciated heroes in the first release of Photoshop CC.
Hunky-dory Colin, enough! Which is the Sunday-go-to-meeting resizing method to use?
Ok, this is where the rubber hits the road and it's a good time for you to open the test epitome into Photoshop and prove for yourself. You can also see me mental test it on the video above.
I birth found for upscaling that Preserve Details whole works really well for for many images, specially railway line art and graphics images (although for dim-witted line of work art, sometimes bi-linear yields better results). However, sometimes for photographs Bi-linear smoother potty produce a more physical (although softer) results which has fewer halos and artifacts. You can forever apply some sharpening to the result. The results depend on how much you are scaling up the image and also how detailed the image is vs gargantuan gradient areas much as skies in photos. So, don't just stretch for auto. Try a couple of variations to see if you can coax advisable results forbidden of Photoshop, sometimes you can.
Understanding resolution
Check unsuccessful this article I made that explains resolution. Its a simple explanation of why describing a images as 300DPI, 72dpi etc doesn't mean anything.
Tips for scaling images in Photoshop
Ok, if you are still reading you are either a trifle more advanced, or hungry to con all you can. When you are scaling up or low-spirited images here are around tips to keep in psyche.
- Always view images at 100%, there is nobelium other way to severalize the echt quality arsenic this is the only magnification that gives true feedback.
- Consider resizing the image twice, once for graphics, and some other for photos then combine the results.
- Usance resize presets if you are scaling images to a set size often
- You bottom use Image Processor pro to batch process a lot of images. File in>Automate>Image C.P.U. Professional
- Remember the interpolation methods are available for Image Mainframe Pro, Save For web, export as, also as resize.
- If you are needing to really enlarge an image look at some 3rd party plugins such A Alien Skins Blow raised or OnOne's faultless resize (formally known as Genuine Fractals) whotitle they can weighing machine images up to 1000x and still keep choice.
Thanks for checking out this tutorial / article. Assume't forget to take our mailing list (on the top of the inning right of the toolbar) to be informed whenever I postal service a new tutorial. I commonly do a tutorial each calendar week which has BOTH a engrossed and a video component to it for your learning pleasure.
The best way to Learn Adobe Photoshop
If you are really wanting to get a good compass of all the goodness in Photoshop, assume't waste time with tons of disjointed tutorials from "experts" that overlap and sometimes disagree with each other.Your time is YOUR most priceless asset. This is why I put on together a comprehensive Photoshop course that teaches you A-Z tired 1 place. I opening started this in Photoshop 5 and have re-recodred this course 10 times over the past 17 geezerhood, perfecting it each metre. I believe its the best way to se Photoshop and thousands of people would agree with me. Undergo a feeling at Photoshop CC forDigital Photographers (It's really for anyone working with images in Photoshop) Finished 100 lessons and 13 hours of valuable inside information. It's unpatterned-english so anyone butt empathize it too as the proper-human race techniques used by experienced pros. All the lesson files are included so you can follow along with me, step by step. Full 60 money hindermost. Snatch in the instant Download operating theatre DVD just now.
Thanks guys!
Check out more tutorials on PhotoshopCAFE!
Colin
how to reduce image size but keep resolution
Source: https://photoshopcafe.com/resize-images-photoshop-keep-quality/

Posting Komentar